Showing posts with label Framelits. Show all posts

Saturday, August 2, 2014

By the Tide

I made this birthday card for my son who loves to go fishing 
The colors are Pool Party and basic black  The Circle framelits and Bitty Banners framelits were used with the  Big Shot.  The stamp set is By the Tide.

Thanks for visiting!

Thursday, June 12, 2014

Petite Petals Plus More

While  browsing through the new catalog I found a card on page 125 that I liked. When I started to make my card, I decided to step it up a bit. 
Using my Stamp-a-ma-jig and a stamp from Summer Silhouettes I created the background for the small area on the front.  The Chalk Talk Framelits, Petite Petals stamp set and punch, and Bitty Banners stamp set and Framelits completed the front.  The  beautiful swirl is from Everything Eleanor.

The inside of the card was stamped with the same swirl.  I like to decorate the inside, stamping lightly so it can be written over if necessary.


List of Supplies:

Stamp sets: Petite Petals, Itty Bitty Banners,  Everything Eleanor, Summer Silhouettes
Card Stock: Crisp Cantaloupe, Garden Green, Calypso Coral, Whisper White
Ink: Crisp Cantaloupe, Garden Green, VersaMark,
Accessories: Gold EP, Bitty Banners Framelits, Big Shot, Heat Tool, Stamp-a-Ma-Jig, Basic Rhinestones, Stampin' Dimensionals

Thanks for visiting,

Thursday, March 27, 2014

Simple Stems Card for Spring

These lovely flowers are from the Simple Stems stamp set (pg. 33 Occasions Catalog).  My  inspiration came from a layered card by Ann Schach.  I loved the combination of colors.  The DSP is one of the free Sale-a-Bration products available through March 31st  with a qualifying purchase.
There is lots of cutting and layering to give the 3-D look, but I enjoyed putting it all together.  The flowers are embellished with Basic Pearls of various sizes.
The Secret Garden Framelits Dies were used for the large flower and the leaf stem.
Paper Piercing adds detail on the white background. The sentiment is from the Peaceful Petals stamp set.

You have just a few more days left to make your purchase and earn a free Sale-a-bration product before it ends on March 31st. 

Thanks for stopping buy!


Wednesday, February 5, 2014

Peaceful Petals Artsy style

We had several days of rain last week so I decided to make something that was bright and cheery.
The Peaceful Petals stamp set ( #133104 wood, 133107 clear) can be adapted to many techniques, so I chose sponging and water coloring for my techniques.

After stamping and coloring the flower I added some Crystal Effects to the flower center.
The floral theme was repeated on the inside. It was stamped ever so lightly with Smoky Slate ink.
I ended up using the Big Shot for the remainder of the project.


Card stock and ink colors used were Pool Party, Crushed Curry, Crisp Cantaloupe, Tangerine Tango, Daffodil Delight and Whisper White.
Accessories include the Big Shot, Magnetic Platform and Standard Platform, Apothecary Arts Framelits, Beautiful Wings Embosslits, Finishing Touches Edgelits, Square Lattice Textured Impressions Embossing  folder, Basic Pearls, Sponge Daubers, Aqua Painter, assorted markers and Crystal Effects.

Thanks for stopping by today!

Saturday, July 20, 2013

Daydream Medallions


This pretty card was cut so the top fold opens from the decorative points  at the top.  The stamp set Daydream Medallions and the coordinating Floral Frames Collection of Framelits were used.  This was really an easy card to make.  The stamps were inked with Baked Brown Sugar ink before stamping and cutting them out with the Framelits on the Big Shot.  The new Magnetic Platform made this so easy to do!  The sentiment from Teeny Tiny Wishes was stamped in Wild Wasabi and cut out with the Bitty Banners framelit.  A piece of linen thread and a glue dot were used to attach the  button and banner.

The floral pattern was stamped again on the inside.  The  sentiment is  from the Thoughts  & Prayers stamp set.
Other supplies used were Pretty in Pink (retired) card stock  and ink, as well as a piece of Designer Series paper stacks, (retired), and Whisper White card stock.

Thanks for stopping  by my blog.  Hope you have a lovely day!


Friday, June 7, 2013

Butterflies for a Birthday

I was inspired by a card  I found recently on Amy  Bollman's blog.  The colors as well as the pretty layout were CASED although some elements were modified when I made my card.

I added texture on the large circles by running card stock through some embossing folders and  then punching out the circles.
The Basic Rhinestones provide the perfect bling on each butterfly.  Each element uses the same three colors: Calypso Coral, Pool Party, and Summer Starfruit.
The birthday sentiment is from Elementary Elegance, a retired Sale-a-bration set.
Other supplies are:
Papillion Potpourri Stamp set
Elegant Butterfly punch
1" and 1 1/4" circle punches
Bitty Banners Framelits
Pool Party, Calypso Coral, and Summer Starfruit card stock and Inks
Whisper White card stock for the card base
Square Lattice, Perfect Polka Dots, &  Houndstooth Embossing Folders
Vintage Faceted Designer Buttons
1/4" white grosgrain ribbon, dyed with sponge and Pool Party ink pad
Every Day Enchantment brads, retired.

This is a wonderful card for butterfly fanatics!  I hope you have fun with them, too.

Friday, January 25, 2013

Happy Birthday with MDS


This is my first MDS project that I've actually  finished and printed.
It's a birthday card for my DH, and it is a tag that I designed using a photo of his very first car, an antique automobile.
This is a hybrid card.  The happy birthday sentiment was stamped and cut out with a banner framelit.  The card stock is Not Quite Navy, Baja Breeze and Whisper White.
The stripes embossing folder was used for the layer behind the tag with the photo.  I'm glad I've finally made a finished project with MDS.
 
Thanks for looking !
 

Thursday, December 6, 2012

Warm Winter memories

I saw a card on Stampin' Connection that used this sketch.  I liked how the ice skates (from the Warm Winter Wishes) fit into the Apotheary Accents framelits.
The snowflakes were punched with the Bigz Snow Flurry die.  I used a sponge and a little Bashful  Blue ink to add color to the snowflakes.  Blue rhinestones (non SU) were added to the centers.
The pretty pleated ribbon (retired) is Riding Hood Red and the card stock is Marina Mist.
Thanks for visiting. 
I appreciate you comments.

Thursday, November 8, 2012

Everything Eleanor in Pink


Today I am sharing a card using the Everything  Eleanor stamp set.  The card qualifies for the Less is More Week 92 Colour Challenge using the color pink. I decided to frame the  blossom as the focal point by layering the blossom inside the framelit from the Labels Collection dies. 

First the blossom was stamped on Pink Pirouette paper with Regal Rose ink.  Next I stamped it on Whisper White card stock. The tiny flower was stamped and embossed in VersaMark  on Vellum card stock.  It was colored on the back with a pink marker.  Both flowers were cut out, curled on the edges and layered over the stamped image.  A rhinestone brad from the Circle Fire collection (retired) holds the blossom together.


The swirl from the stamp set was added on the front in Old Olive ink, stamped off once.  A little pink color was sponged around the stem to carry the color  below the blossom.


Inside, the small blossom was repeated by stamping it on the white card stock. 

I like using the tent fold because it repeats the vertical arrangement of the floral design.  
You can view other entries into this Color Challenge by clicking here.
Thanks for visiting today!


Tuesday, March 13, 2012

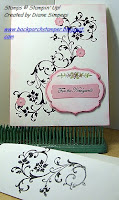
For the Newlyweds

It's always nice to have a variety of special occasion cards ready to use.  I  seemed to be getting low on wedding cards, having just used two in the past few weeks.  So here's another one I came up with today.
The beautiful black swirl is from Elements of Style stamp set and it was stamped and embossed with black craft ink and EP.  The pretty label shape is from Apothecary Art stamp set, available in the current Occasions Mini Catalog.  The top label shape was cut by hand.  The Blushing bride color  behind the sentiment was cut with the new Framelits labels dies.
The modern label punch was used to punch out the phrase "For the Newlyweds" which is from the Teeny Tiny Wishes stamp set.
The tiny blossoms are punched with the Itty Bitty Shapes punch pack and decorated with tiny pearls from Basic Pearls collection.
The flap of the envelope is embossed to match the scroll on the card.
Here are a few more views you may enjoy:

 Close up of the sentiment.
Sentiment inside the card is from the retired stamp set Elegant Inspirations.


The last photo shows the card front and embossed flap of the envelope.


Thanks for stopping by today.  Please come back soon!

Wednesday, February 8, 2012

With Love valentine

I've been playing with my new Framelits and  Edgelits die cuts for some of my Valentine cards.  This card uses the Labels collection # 2 and #3 dies.  I stamped the With Love sentiment from the  Hand-Penned Holidays stamp set.  The white background was embossed with the Houndstooth textured impressions embossing folder, then cut with  the Edgelits die.  I love the added trim on the bottom of the card!
A small heart was added below the sentiment and embellished with a small pearl.
Papers used were Whisper White and Melon Mambo.

Tuesday, February 7, 2012

Razzleberry Valentine

This card was created from some left-overs from other projects. At first I wasn't sure it would work, but I think it makes an interesting card.
The heart is from the Take it to Heart stamp set.  It was cut out and layered on a heart cut from Very Vanilla card stock.  The patterned paper is from the Paisley Petals DSP collection.
The lacey border was made with the Lace Ribbon Punch and Very Vanilla card stock.  It was layered onto the front of a Razzleberry card. 
The label behind the heart was cut with the new Framelits labels collection of die cuts.  That paper was a scrap I had embossed and didn't use on another project.  I used a sponge dauber to gild the edge with champagne mist shimmer paint. Love that extra little bit of sparkle!  Of course, the little rhinestone on the heart adds some extra bling, too!
These are colors I would not normally have thought of using for a valentine project, but I like the way it ended up.

Thanks for visiting.